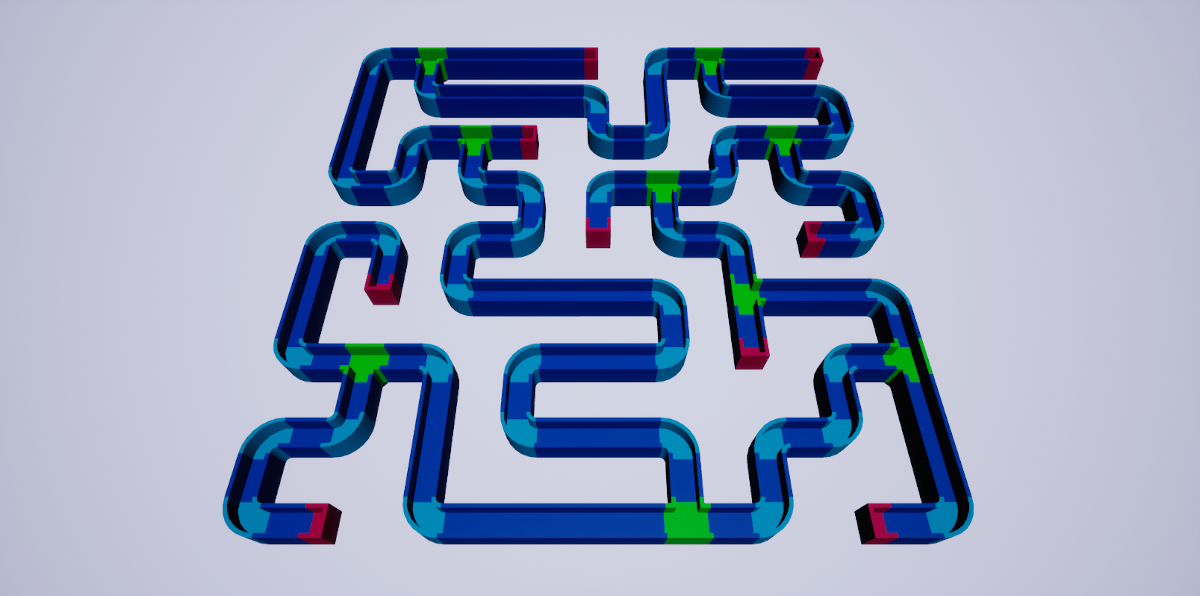
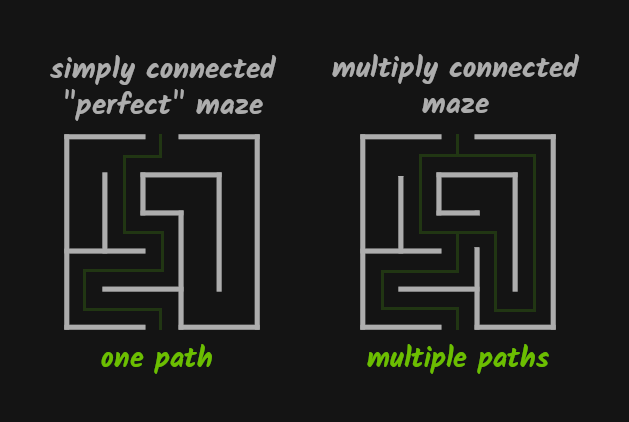
AMazeGenerator, a custom Actor class we're going to build together in this and the following part, will be able to generate a multiply-connected maze from just 5 modular pieces. By the end of the second part, we'll end up with something like this.
If you wish, you can download the final example project right now. It includes complete code and assets from both parts. I've built the project in Unreal Engine 4.27.2, yet I tried the implementation in the early access version 5.0.0, and it still worked without any changes.
Before we dive into the depths of an algorithm for maze generation today and a pattern matching in the upcoming part – those will be the heart and blood of our maze generator – let's zoom out a bit to establish a common ground. So we'll have a clear, high-level overview of what we're going to build.
First, I already mentioned that our maze is going to be multiply connected, which means our generator will produce a maze that satisfies the first of these two requirements:
- Every point in a maze is reachable
- There is one and only one path from one point to another
If it would satisfy both of them, we'd have a simply connected maze, also known as a "perfect" maze. Though we can end up with a perfect maze by chance, it's not guaranteed. In fact, with the increasing size of our maze, that chance decreases rapidly.
There are several types of mazes and many different algorithms to generate them. Some of them always produce a perfect maze. In this series, I cover just one algorithm, which is simple yet effective and uses recursion.
However, we'll first create just a memory representation of our maze, and then we're going to build the actual maze by placing and rotating pieces according to that representation.
That means, if you'd want to use a different algorithm in the future, all you'd need to do is to swap that single function that is responsible for creating the representation.
I don't intend to bore you with a long introduction when such a fun topic as maze generation awaits us. And how to store a maze in a computer memory feels like a great place to start. So, let's get started!
How To Store A Maze In Computer Memory
Before I'll tell you how I choose to represent our maze in memory, pause for a few seconds after the following paragraph, and think about how you'd do it.
Think about strings stored as an array of characters, and these characters are numbers, not actual letters, so you need an encoding table that tells you which number corresponds to which character. Can that be a source of inspiration? And how about matrices? Could a matrix be useful for us here somehow?
Now you're maybe thinking about storing our maze as a two-dimensional array of numbers, where 1 means wall and 0 means path and if so, well done! It's a reasonable choice if you look at the picture below.
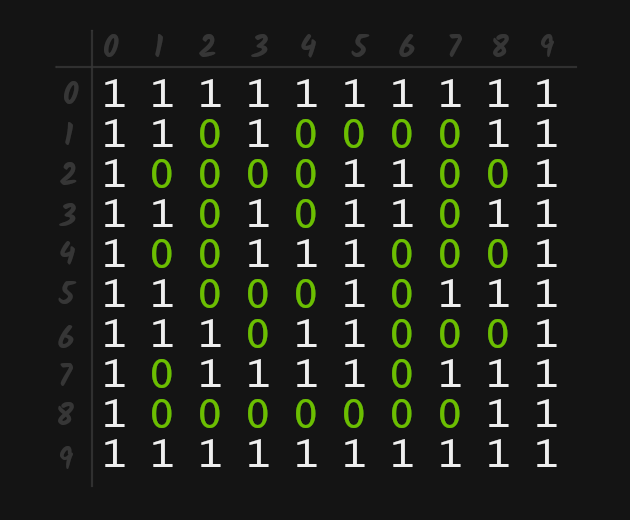
In a 2D array, you can access any value easily using two indexers, Maze[0][0] is the first element in the first row, Maze[9][9] is the last in the last row, no rocket science here.
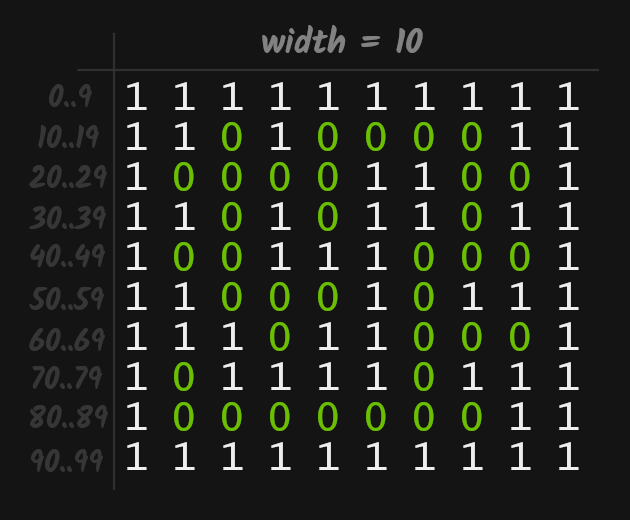
However, I'd like to store our maze in a single-dimensional array because we don't need an array of arrays, which 2D array is under the hood.
We can have our maze stored in memory as a flat, continuous block of numbers and, still, treat it like a 2D array. As long as we're consistent with the width of our maze, we can get away using this relationship:
[x][y] = [x + y * width]
If you figured this by yourself, well done, and thumbs up! If not, no worries, me neither, I've been taught this before :-).
In the next section, we'll encapsulate the maze array in a custom class, so instead of repeating Maze[x + y * width] every time we need to get or set a value, we use Maze.Get(x, y) and Maze.Set(x, y, value) functions.
Creating AMazeGenerator Actor Class
Now, it's time to get our hands dirty and start building the actual maze generator. I'll be explaining the rest of the theory on the fly.
If you want to follow along, create a new Unreal project and add a new C++ class derived from Actor. Let's call it MazeGenerator.
In AMazeGenerator.h, let's declare in the protected section an inner MazeData class. As I mentioned in the previous section, this class encapsulates a Data array where 1s and 0s will represent the walls and paths of our maze.
    class MazeData {
    public:
        MazeData(AMazeGenerator& MazeGen) : MazeGen{MazeGen} {}

        void Init()
        {
            Data.Init(1, MazeGen.Width * MazeGen.Height);
        }

        int8 Get(int32 X, int32 Y) const
        {
            return Data[X + Y * MazeGen.Width];
        }

        void Set(int32 X, int32 Y, int8 value)
        {
            Data[X + Y * MazeGen.Width] = value;
        }

    private:
        AMazeGenerator& MazeGen;
        TArray<int8> Data;
    };
    MazeData Maze = MazeData(*this);
We declared TArray<int8> Data in the private section of MazeData. We also need to wire a reference to the outer class, the AMazeGenerator, itself.
Notice how we passed the reference to the outer class by dereferencing a pointer to this (*this) when creating an instance of MazeData class after the class declaration.
We pass a reference to the AMazeGenerator because we need access to its Width and Height properties when initializing Data in the Init function. And also access to Width in the Get and Set. We're going to declare these properties in a moment.
The other Init function, the one we call on Data itself, is a function of the TArray class. The first argument is the initial value of all elements. The second is the size of the array.
We set 100 and 50 as the initial values of Width and Height, so the Data array after calling the Init function will be an array filled with 5000 (100 * 50) 1s.
In the Get and Set, you can see how we get elements and set their values in the Data array using the beforementioned formula x + y * Width. The Width once again comes from our reference to AMazeGenerator.
After MazeData, let's implement another inner class, call it WorldDirections. That's the last one, I promise. I decided to implement both of them as inner classes right here to keep things simple.
class WorldDirections {
public:
    void Shuffle() {
        for (int32 i = Data.Num() - 1; i != 0; i--) {
            int32 j = rand() % i;
            Data.Swap(i, j);
        }
    }
    int8& operator[](size_t i) { return Data[i]; }
    int32 Num() { return Data.Num(); }
private:
    TArray<int8> Data = { 0, 1, 2, 3 };
};
WorldDirections Directions;
As you can see, this class encapsulates a tiny array of four numbers, each representing one of four directions – up, right, down, and left. In the left-handed Cartesian coordinate system of the Unreal world, these correspond to positive X, positive Y, negative X, and negative Y.
You may have noticed that if we put these numbers on a clock face, starting from noon and moving clockwise to 3, 6, and 9 o'clock, the directions match with directions of hands.
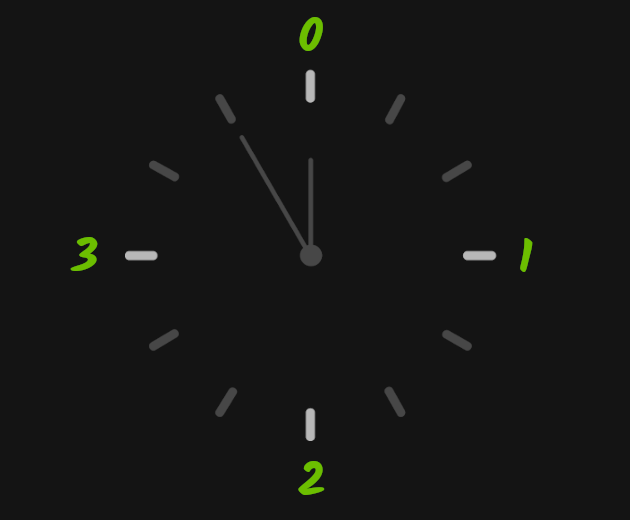
That's not a coincidence. A mental connection of something new with something already known is the best way to remember the new.
It also corresponds with directions you can move the player pawn with WSAD keys when it has the default rotation (0 degrees along all axes), thus facing the positive X direction.
We overloaded the [] operator for convenient access to the Data array. We also exposed Data.Num(). It returns the total of elements in the Data array.
Most importantly, we implemented the Shuffle function. It uses a simple Fisher-Yates algorithm to randomly shuffles elements in the Data array.
And as before, right after the class definition, we created an instance of it. This time we don't need to pass any references. Why we have this helper class will become clear from the Step function, which we're now going to declare as such.
void Step(int32 X, int32 Y);
The Step would be a recursive function as it will directly call itself over and over, traversing our maze, initially filled with 1s, replacing those 1s with 0s, thus creating paths through until there's nowhere else to go.
We'll see that each call is a step through the just emerging maze, hence the function name, Step. I also called a similar function in another project "Dig" because when you visualize how it goes, it looks like it digs its path through initially a solid space.
In the public section of AMazeGenerator class, we're now going to declare the abovementioned Width and Height properties of our maze and a starting point for the Step function, the initial values for its X and Y arguments, StartX and StartY.
We'll also expose these members using UPROPERTY macro, so we can later change these values in the editor.
UPROPERTY(EditAnywhere)
    int32 StartX = 5;

UPROPERTY(EditAnywhere)
    int32 StartY = 5;

UPROPERTY(EditAnywhere)
    int32 Width = 100;

UPROPERTY(EditAnywhere)
    int32 Height = 100;
Now, let's switch to MazeGenerator.cpp and in the BeginPlay function, first, initialize our Maze and right after that call the yet not implemented Step function, passing the initial StartX and StartY values.
void AMazeGenerator::BeginPlay()
{
    Super::BeginPlay();

    Maze.Init();
    Step(StartX, StartY);
...
You're now may be asking why we're not initializing our array in the MazeData constructor, and that's an excellent question. If we've done so, we'd introduced quite a nasty bug.
Our code would initially work as expected. The problem will occur only when we'd increase Width and Height properties in the editor. Maze Data array would be already initialized, with smaller (!) values (default Width and Height from AMazeGenerator and we'll eventually try to access data outside the upper bound of the array. When this happens, the editor crashes, throwing IndexOutOfBoundsException.
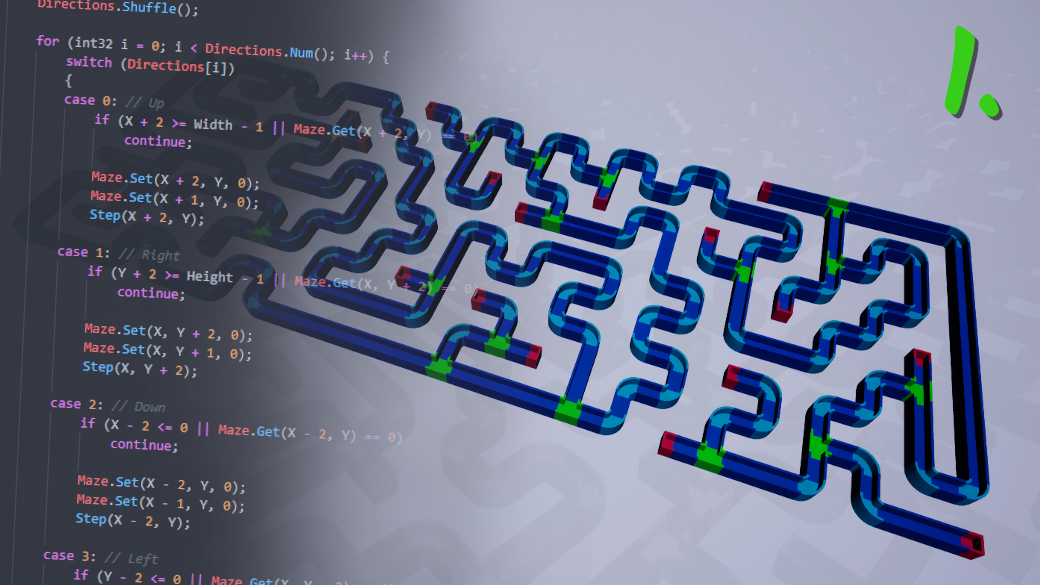
It will be clearer from the Step function that we'll implement now. First, I'll paste here the entire implementation. Take a brief look at it, and then I'll explain the algorithm step by step.
void AMazeGenerator::Step(int32 X, int32 Y)
{
    Directions.Shuffle();

    for (int32 i = 0; i < Directions.Num(); i++) {
        switch (Directions[i])
        {
        case 0: // Up
            if (X + 2 >= Width - 1 || Maze.Get(X + 2, Y) == 0)
                continue;

            Maze.Set(X + 2, Y, 0);
            Maze.Set(X + 1, Y, 0);
            Step(X + 2, Y);

        case 1: // Right
            if (Y + 2 >= Height - 1 || Maze.Get(X, Y + 2) == 0)
                continue;

            Maze.Set(X, Y + 2, 0);
            Maze.Set(X, Y + 1, 0);
            Step(X, Y + 2);

        case 2: // Down
            if (X - 2 <= 0 || Maze.Get(X - 2, Y) == 0)
                continue;

            Maze.Set(X - 2, Y, 0);
            Maze.Set(X - 1, Y, 0);
            Step(X - 2, Y);

        case 3: // Left
            if (Y - 2 <= 0 || Maze.Get(X, Y - 2) == 0)
                continue;

            Maze.Set(X, Y - 2, 0);
            Maze.Set(X, Y - 1, 0);
            Step(X, Y - 2);
        }
    }
}
It's the essential logic of today's part. So what's going on here? First, we shuffle our Directions.
Directions.Shuffle();
After that, the Data array of the Directions class can have its elements shuffled, for example, like this.
{ 0, 3, 1, 2 } // Up (+X), Left (-Y), Down (-X), Right (+Y)
Let's now continue further down the Step function execution. We see a for loop over our just shuffled Directions, and in this loop is a switch statement for each possible value, each direction.
    for (size_t i = 0; i < Directions.Num(); i++) {
        switch (Directions[i])
        {
           ...
In the first iteration, the index i is 0, and the first element of Directions, the one at index 0, has a value of 0 (up, or X+). The switch falls into the first case.
case 0: // Up
    if (X + 2 >= Width - 1 || Maze.Get(X + 2, Y) == 0)
        continue;

    Maze.Set(X + 2, Y, 0);
    Maze.Set(X + 1, Y, 0);
    Step(X + 2, Y);
Here we have an if statement where we first check if we're close to the edge of our maze. To be precise, the two steps below the upper edge. Then we check if at position two steps in the up direction is already a path (0 is a path, 1 is a wall).
The Width and Height of our maze are both set to 100, and X and Y are our initial values of StartX and StartY, which we both defined in MazeGenerator.h to be 5.
Let's plug in these numbers and solve these expressions by hand. The first one is simple.
5 + 2 >= 100 - 1
7 >= 99
false
No, the number 7 is not bigger or equal to 99. We're not too close to the upper edge. In fact, our starting position { 5, 5 } is on the opposite side, close to the bottom left corner.
For the subsequent expression, we remember what's going on in Maze.Get(X,Y) is return Data[X + Y * MazeGen.Width] so we can expand and solve it like this.
Data[(5 + 2) + 5 * 100 + 5] == 0
Data[705] == 0
1 == 0 // We know that our MazeData::Data array we have filled with 1s.
We initialized it as such in BeginPlay.
false
Both expressions are false. We don't branch to the continue; statement. Instead, we set two adjacent elements up from our starting position to 0, and we call Step function within itself (recursion) with new values.
Let's once again plug in the actual values and evaluate expressions.
Maze.Set(5 + 2, 5, 0); // => Data[(5 + 2) + 5 * 100] = 0 => Data[507] = 0;
Maze.Set(5 + 1, 5, 0); // => Data[(5 + 1) + 5 * 100] = 0 => Data[506] = 0;
Step(7, 5); // (5 + 2, 5)
This picture illustrates the current state of the small part of our maze array around the starting position { 5, 5 }, which is the item with index 505.
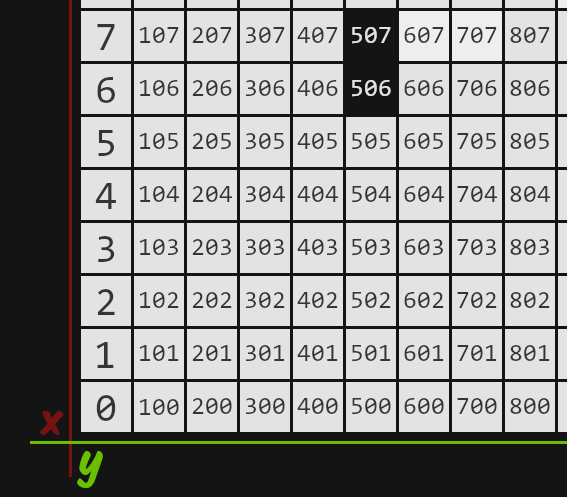
Notice the starting element itself remained unchanged. The next starting point is at position { 7, 5 }, which is the element 507 two steps up in the up direction from the current starting point { 5, 5 }.
Now, let's do one more Step together, and then I recommend you to continue with another one or two on your own.
Personally, when I need to wrap my head around an algorithm, especially a recursive one, take a pen and a paper and "execute" it by hand, a line after line helps a lot.
So, now we're back at the beginning of the Step function, with new X and Y values, which are 7 and 5, respectively. We shuffle our Directions, and let's say we've got this time:
{ 1, 0, 2, 3 } // Right (+Y), Up (+X), Down (-X), Left (-Y)
With these values, the execution will look almost the same. The only difference would be in the direction. This time, we'd fall in the switch statement into a case for value 2 (right direction, +Y), and in the end, the elements 707, and 607, will be set to 0, and new parameters we'll pass to the Step function will be 7, 7.
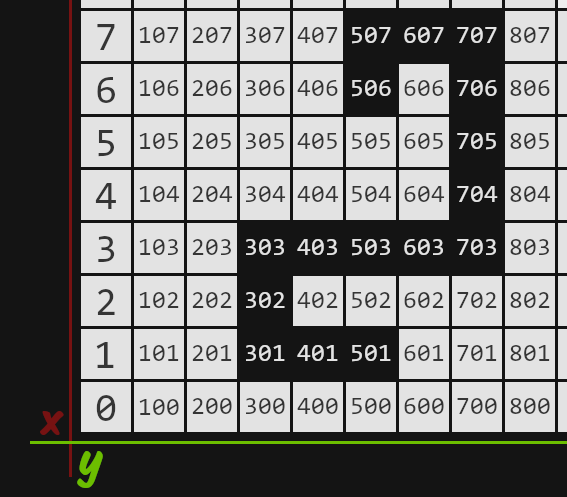
Instead of explaining the same thing again, let's skip a few steps and imagine our maze is now in the state that illustrates the following picture.
We call the Step function passing X and Y as 1 and 5. We shuffle our Directions once again and end up with elements like this.
{ 0, 2, 3, 1 } // Up (X+), Down (X-) , Left (-Y), Right (+Y)
We again fall in our switch statement in the case for value 0. Let's expand and plugin values into our if statement as before. The first expression is:
1 + 2 >= 100 - 1
3 >= 99
false
Of course, we're almost at the very opposite side of our maze. We cannot escape the maze by going just two steps up. But what about the second expression?
Data[(1 + 2) + 5 * 100] == 0
Data[503] == 0
0 == 0 // We can see that element at index 503 is already set to 0.
true
Aha! Now we have false or true, which evaluates as true. We branch and hit...
continue;
We're at the top of our switch statement, but this time, we take the value of the second element from the Directions array, which is number 2 (Down, -X), so we end up in the following case.
case 2: // Down
    if (X - 2 <= 0 || Maze.Get(X - 2, Y) == 0)
        continue;

    Maze.Set(X - 2, Y, 0);
    Maze.Set(X - 1, Y, 0);
    Step(X - 2, Y);
You already see, what's going to happen, right?
1 - 2 <= 0
-1 <= 0
true
We don't even need to evaluate the second expression. We know we can't go down because we'd end up outside the maze, thus outside the array, throwing an IndexOutOfBoundsException.
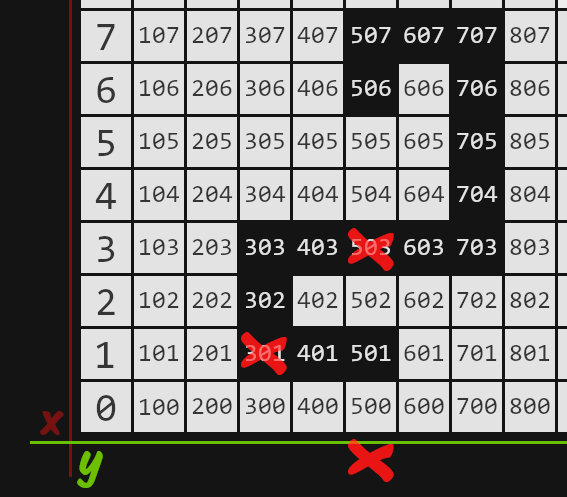
After we branched and hit continue, we're once again at the top of our switch statement, this time with the value of 3 (Left, -Y). We can't go left, for the same reason we can't go up.
We can see the only way to go is to the right. Which is the case for value 1, which happens to be the last element of Directions as it's currently shuffled.
We'd go right, making paths at 601 and 701 and calling Step function again with parameters 1 and 7.
And that's it. The recursive function Step calls itself on and on, making paths until there's nowhere else to go. When switch cases for all four directions branches to continue statement, we don't call the Step again, and recursion ends.
To be continued...
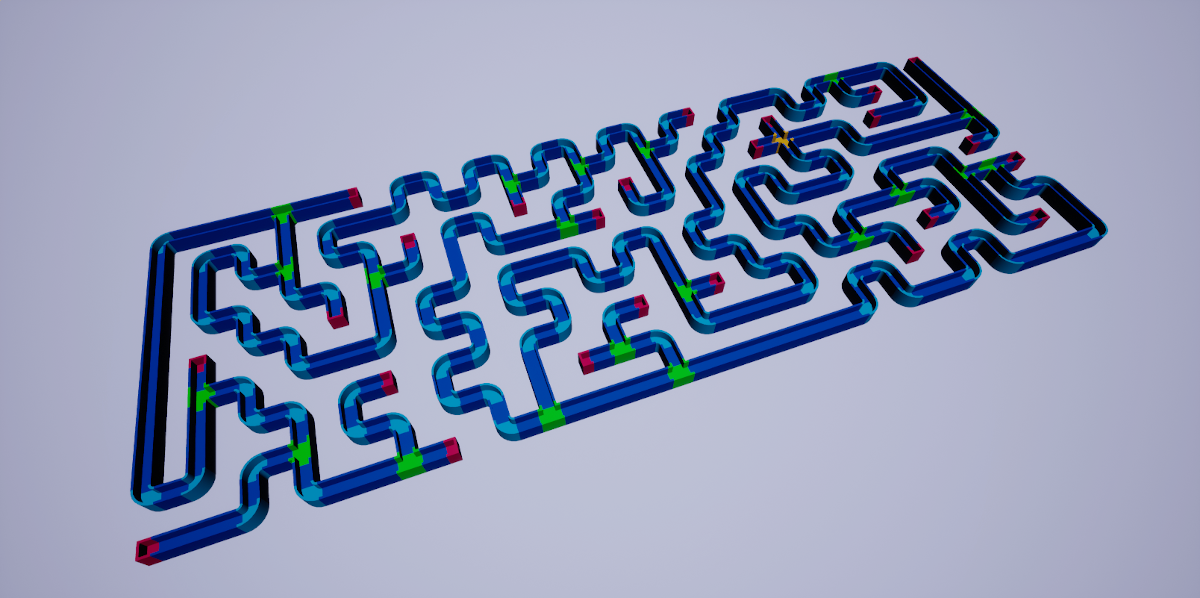
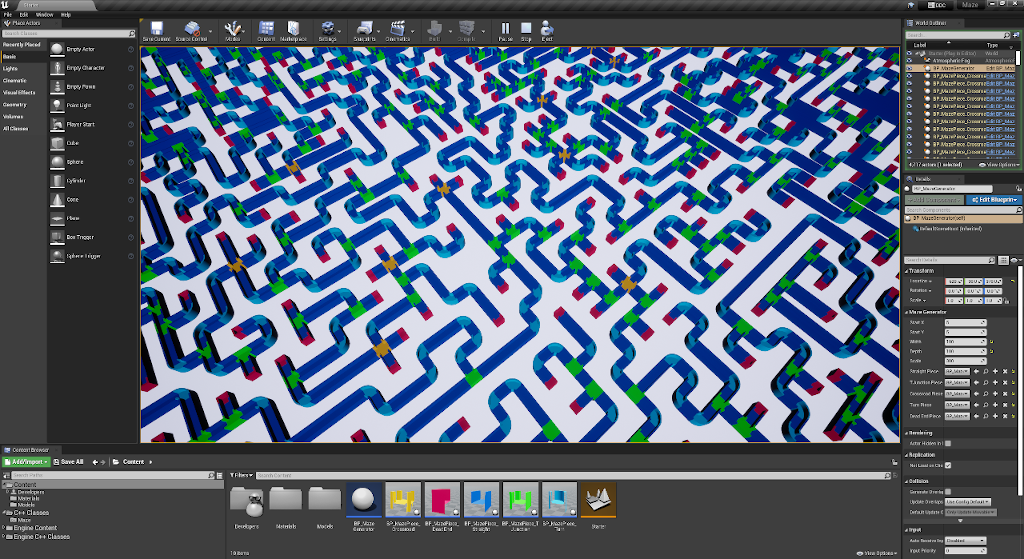
In the next part, we're going to use the memory representation of a maze in the subsequent process when we use clever pattern matching for building a maze out of modular pieces, just like the one you saw in the first image at the beginning of the post or the ones n the screenshots below.
See you in the Part II!