
This is the third post in my series on creating an InventoryItem Editor in Unity that will edit any child of InventoryItem. If you're not caught up, you can read the first post here, and the second post here.
A Better Way to Manage Lists
Probably the thing I hate the most about Unity's built in inspectors is the way it manages Lists and Arrays. Editing a list in the inspector is a pain, especially if that list has any structure to it like the Modifier structure used in StatsEquipableItem.
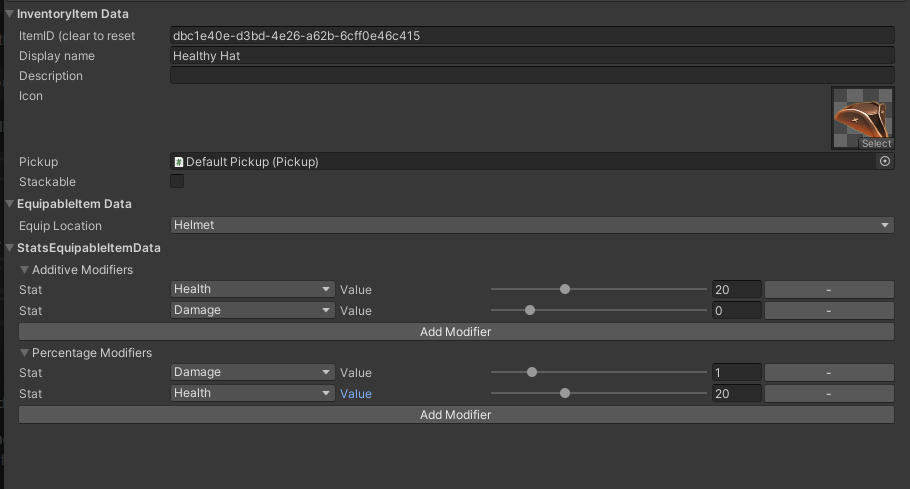
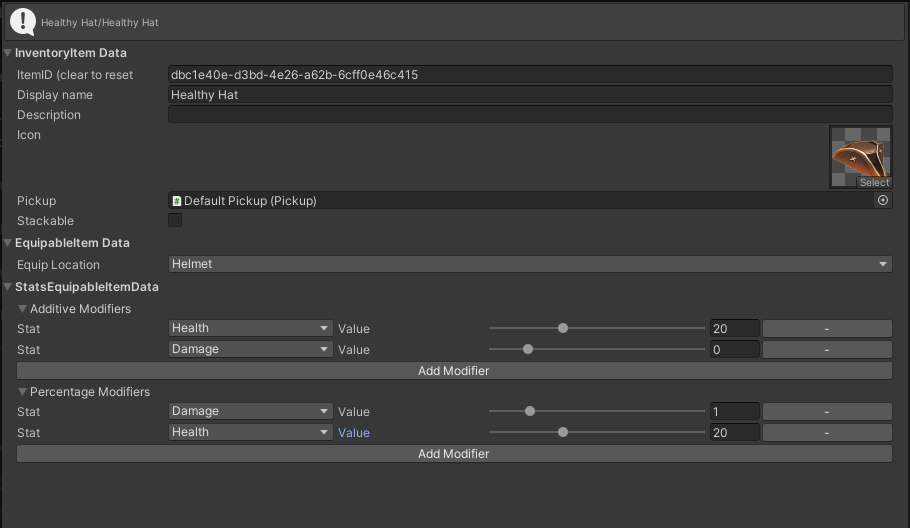
By the end of our lesson, our InventoryEditorWindow's lists will look like this:
We're going to start by making our Setters. In the first few iterations of this inspector, I actually created setters for each of Additive and Percentage modifiers. That meant a separate SetAdditiveStat, SetPercentageStat, RemoveAdditiveStat, RemovePercentageStat, etc. These methods started to pile up very quickly. This time around, I decided to structure things a bit differently by passing the actual list for the setters to work on.
The first thing we need to do is to change our declarations at the top of StatsEquipableItem.cs. We're going to change the Arrays to Lists. Why? Because when you're editing, Lists are an order of magnitude easier to work with than Arrays are.
[SerializeField] List<Modifier> additiveModifiers = new List<Modifier>();
[SerializeField] List<Modifier> percentageModifiers = new List<Modifier>();
Don't worry, you can make this change and not lose any data in our ScriptableObjects because behind the scenes Lists and Arrays are just the same thing, but Lists have better functions for managing the contents.
Now we can make our helper methods. Remember, all of the rest of the code must be within an #if UNITY_EDITOR/#endif block or you won't be able to build your project.
        void AddModifier(List<Modifier> modifierList)
        {
            SetUndo("Add Modifier");
            modifierList?.Add(new Modifier());
            Dirty();
        }

        void RemoveModifier(List<Modifier>modifierList, int index)
        {
            SetUndo("Remove Modifier");
            modifierList?.RemoveAt(index);
            Dirty();
        }

        void SetStat(List<Modifier> modifierList, int i, Stat stat)
        {
            if (modifierList[i].stat == stat) return;
            SetUndo("Change Modifier Stat");
            Modifier mod = modifierList[i];
            mod.stat = stat;
            modifierList[i] = mod;
            Dirty();
        }
The handy thing about objects (like List) is that they are passed between functions as reference automatically. This means that if you pass a List to a function expecting a List, it will receive the pointer to your original list. This means we can modify the list that’s passed to us in a method and the modifications will hold.
There are still restrictions, however, like you cannot add or remove items from the list in a For loop.
Next, we need to iterate over that list and show our fields…
void DrawModifierList(List<Modifier> modifierList)
        {
            int modifierToDelete = -1;
            GUIContent statLabel = new GUIContent("Stat");
            for (int i = 0; i < modifierList.Count; i++)
            {
                Modifier modifier = modifierList[i];
                EditorGUILayout.BeginHorizontal();
                SetStat(modifierList, i, (Stat) EditorGUILayout.EnumPopup(statLabel, modifier.stat, IsStatSelectable, false));
                SetValue(modifierList, i, EditorGUILayout.IntSlider("Value", (int) modifier.value, -20, 100));
                if (GUILayout.Button("-"))
                {
                    modifierToDelete = i;
                }

                EditorGUILayout.EndHorizontal();
            }

            if (modifierToDelete > -1)
            {
                RemoveModifier(modifierList, modifierToDelete);
            }

            if (GUILayout.Button("Add Modifier"))
            {
                AddModifier(modifierList);
            }
        }

        bool IsStatSelectable(Enum candidate)
        {
            Stat stat = (Stat) candidate;
            if (stat == Stat.ExperienceReward || stat == Stat.ExperienceToLevelUp) return false;
            return true;
        }
We start with a temporary variable modifierToDelete set to -1. The logic is as follows… if we want to delete an element, we’ll set modifierToDelete to the index of the modifer. At the end of the for loop, we’ll check to see if the number is greater than -1 and act accordingly.
We’re using a standard for loop with an indexer instead of a foreach loop. For each of the modifiers in the list, we’ll get a reference to the modifier, and begin a Horizontal Layout Group. This will put everything for our modifiers on one line, space divided between the elements.
First we’ll draw our StatPopup, then the value, then finally a button for deleting the element. I used an IntSlider for the values, but you could just as easily use a regular slider. Just be aware that floats look terrible in tooltips.
Notice that with the Stat enumpopup, I once again included a validation method. This lets us filter out stats that don’t make sense to add modifiers to, specifically ExperienceReward and ExperienceToLevelUp. Those two options will be greyed out in the popup.
This leaves our actual DrawCustomInspector() method.
        bool drawStatsEquipableItemData = true;
        bool drawAdditive = true;
        bool drawPercentage = true;

        public override void DrawCustomInspector()
        {
            base.DrawCustomInspector();
            drawStatsEquipableItemData =
                EditorGUILayout.Foldout(drawStatsEquipableItemData, "StatsEquipableItemData", foldoutStyle);
            if (!drawStatsEquipableItemData) return;

            drawAdditive=EditorGUILayout.Foldout(drawAdditive, "Additive Modifiers");
            if (drawAdditive)
            {
                DrawModifierList(additiveModifiers);
            }
            drawPercentage = EditorGUILayout.Foldout(drawPercentage, "Percentage Modifiers");
            if (drawPercentage)
            {
                DrawModifierList(percentageModifiers);
            }

        }
I'm using another foldout section for each of the modifier types as well. This lets you tidy up your inspector even more while you're working on it.
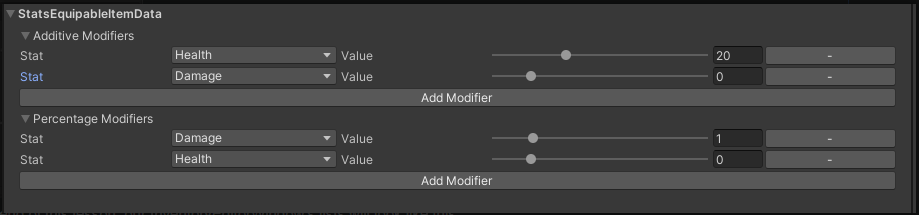
Now our StatsEquipableItemInspector is ready to go, and should look like this:
Personally, I think this looks a little cluttered, even with the foldouts. Let’s add a little visual polish to make each section a touch more visible. We’re going to add a GUIStyle to each section to bring the margins of the content in just a touch, but leave the foldout lines the way they are.
In InventoryItem.cs, add a GUIStyle contentStyle to the properties. It should be a protected style, and should be tagged [NonSerialized] or it might appear in the regular inspector.
Then in the first line of InventoryItem’s DrawCustomInspector add the following line:
contentStyle = new GUIStyle {padding = new RectOffset(15, 15, 0, 0)};Now for each of the content blocks we've created in the DrawCustomInspector methods, after the if check for the foldouts, inset the following line:
EditorGUILayout.BeginVertical(contentStyle);and at the end of the method add
EditorGUILayout.EndVertical();This will bring your content in a small amount on the left and right making things appear a little less cluttered.
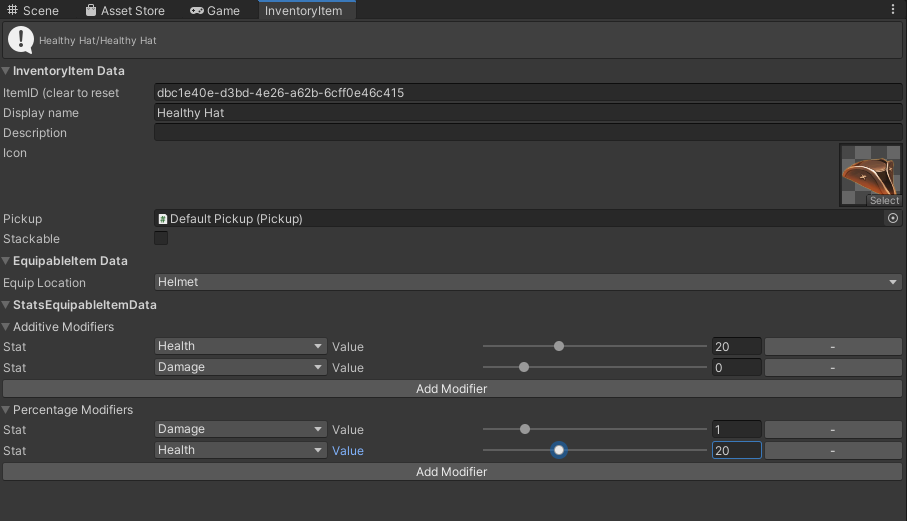
We are now at the point where it doesn't matter if it's a WeaponConfig or a StatsInventoryItem, we can see and edit all of the properties in the same Editor Window.
In the next post, we'll create a simple healing spell/potion that can be dropped in the Actionbar, and set this up for easy editing as well.