In the Complete Blender Creator Course video, Extruding in Blender, our instructor Michael Bridges teaches us how to use the Extrude Tool! This is an awesome tool, and you can use it to extrude faces, edges, and vertices. When you extrude you make new geometry, which you can move around, shape, etc.
This tool is very versatile, because it allows you to change the shape of the objects you are working with. For example, you can take a primitive, such as a cylinder, cube, sphere, or plane, and add new geometry to make a complex object. So, let’s get creative and learn how to use this cool tool!
Let’s go over some basic geometry definitions, which we will be using in Blender.
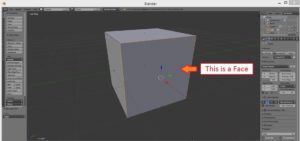
What is a Face?
A face is the surface of an object. For instance, a cube has 6 sides, so it has 6 flat surfaces called faces. In geometry, we call faces planes. Please see picture below:
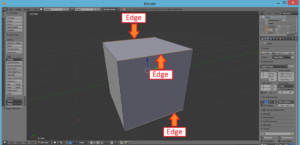
What is an edge?
Edges are the lines, which form where faces join. In geometry edges are called lines. Please see picture below:
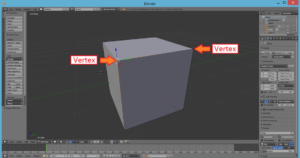
What is a vertex?
A vertex forms where the ends of two or more edges converge. In geometry a vertex is sometimes called a point. Please see picture below:
Extruding Faces
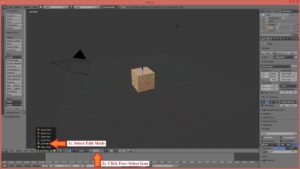
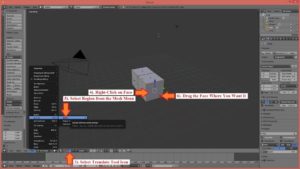
- Select Edit Mode, by clicking on the Options Box at the bottom-left of your screen. It’s important to have Edit Mode selected, or you won’t be able to select the faces, so that you can extrude them.
- Click on the Face Select Icon, which is located at the bottom of your screen.
- Select the Translate Tool Icon, at the bottom of the screen,
- Right-Click on the face that you want to extrude, and if you want to select multiple faces, hold down the Shift key while clicking on more than one face.
- Click on the Mesh Menu, which is located at the bottom-left of your screen. Scroll over Extrude and click on Region.
- Click and drag the face or faces where you want them to be. You can also press the short-cut key E, to Extrude.
Please see pictures below for the details about these instructions:
Extruding Edges
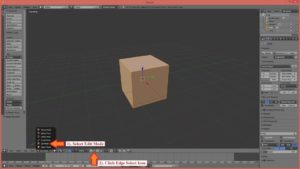
- Again, select Edit Mode, which is located in the options box at the bottom left of your screen.
- Click on the Edge Select Icon, which is located next to the Face Select Icon that you clicked on earlier.
- If it’s not already selected, click on the Translate Tool Icon, which is located at the bottom of the screen.
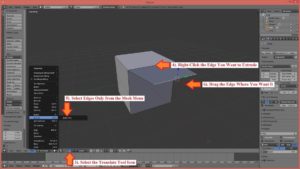
- Right-click on the edge you want to extrude, and again, if you want to select more than one edge at once, hold down the Shift key and select multiple edges.
- Click on the Mesh Menu, which is located at the bottom-left of your screen. Scroll over Extrude and click on Edges Only.
- Drag the edge in the direction you want it to go. Release the mouse button, when the edge is where you want it to be.
Please see pictures below for the details about these instructions:
Extruding Vertices
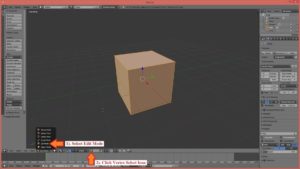
- As always, make sure that Edit Mode is selected, on the bottom-left of the screen.
- Click on the Vertex Select Icon, which is in the same box as the Face Select and Edge Select Icons, at the bottom of the screen.
- If it’s not already selected, click on the Translate Tool Icon.
- Right click on the vertex you want to extrude, and again, you can hold down Shift while you select multiple vertices, if you want to extrude more than one.
- Click on the Mesh Menu, at the bottom left of the screen, scroll over Extrude, and click on Vertices Only, in the side menu that pops out.
- Drag the vertex the direction you want it to go.
Please see pictures below for the details about these instructions:

Tip: You can select 3 or more of the extruded vertexes, while holding the Shift key. After that, press the F key to make a face that will fill in the space between the vertexes.
I have enjoyed showing you how to extrude faces, edges, and vertices. I can’t wait for the next blog! Haven an awesome day!
About the Author:
I’m Elizabeth R. Laurie and I’m taking the Complete Blender Creator Course, Complete Unity Developer Course, Unreal Engine Developer Course, Pass the Unity Certified Developer Exam Course, Make Mobile VR Games in Unity with C# Course, Automate Blender with Python Course, and Game Physics Course. I love to learn!
I picked up my first coding book when I was 8 years old, but I was frustrated about the fact that the author didn’t explain how the code worked, and I was even more frustrated when the graphics on the screen were so bad. I mean, I went through 4 or 5 hours of typing code from the book, into the computer, and nothing spectacular happened!
Flash forward to the present! Technology has really grown, and now, I’m taking these awesome courses and learning a lot of cool things about programming! This time, the lessons are much clearer and the graphics are totally cool!
I have always been fascinated with animation and video games, and I plan to use these platforms to make clean, family oriented, entertainment. I also plan to revolutionize education, and make it fun for everyone!