
Part 1: Drawing the basic InventoryItem Data
This series of blog posts will be devoted to the creation of an InventoryItem editor, using some of the skills taught in the first section of the RPG: Dialogues and Questing course. It relies on the code taught in the RPG:Inventory Systems course.
In the Inventory Systems course, all inventory items including weapons, armor, and even actions and potions are based on the scriptable object class InventoryItem. My goal in creating this InventoryItem Editor was to create one EditorWindow that is capable of drawing any InventoryItem or child of InventoryItem. The challenge with such a project is that each of these child classes has both common attributes and unique attributes only found in those classes. I will show you how to leverage the power of OOP, inheritance, and virtual methods to edit them all with one EditorWindow script.
I will also show you how to use the EditorWindow to show a preview of the tooltip that will be shown to the player whenever they hover over the item in their inventory.
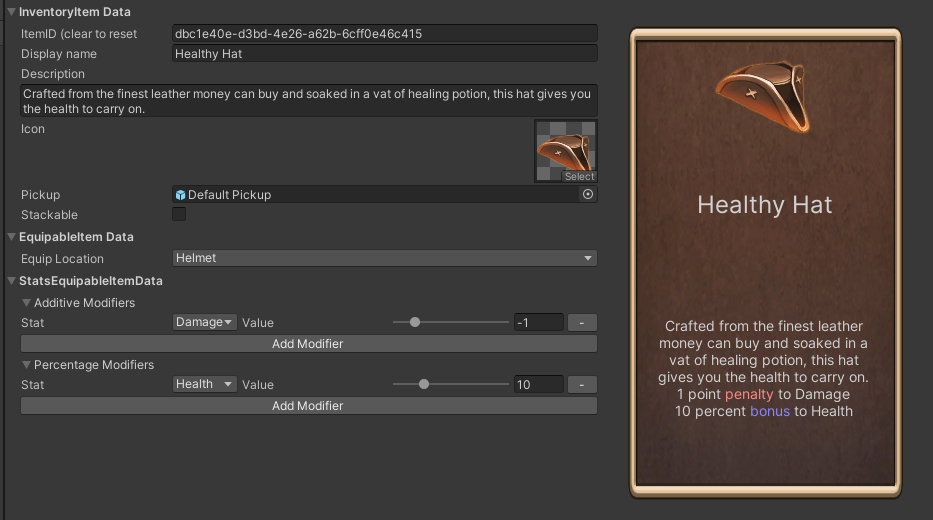
The next few screenshots will show you what we'll be building over this series of blog entries:

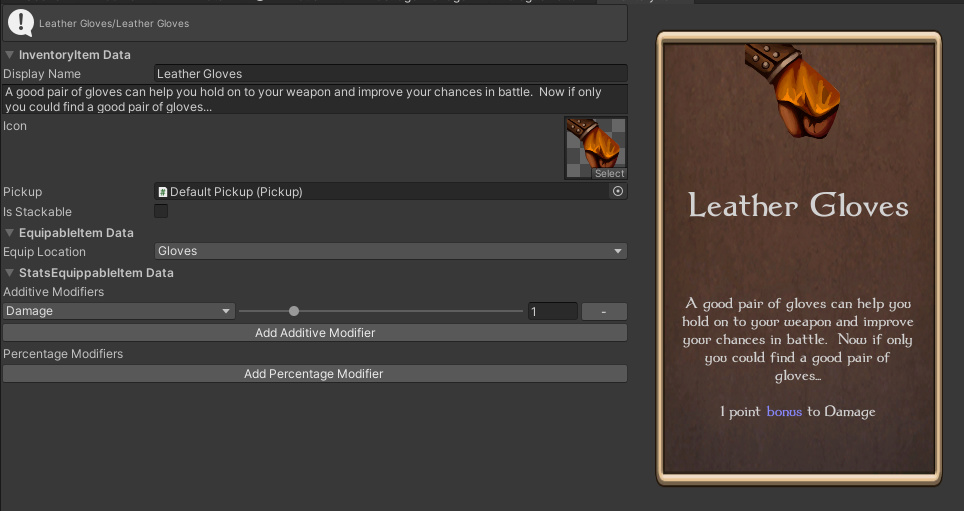
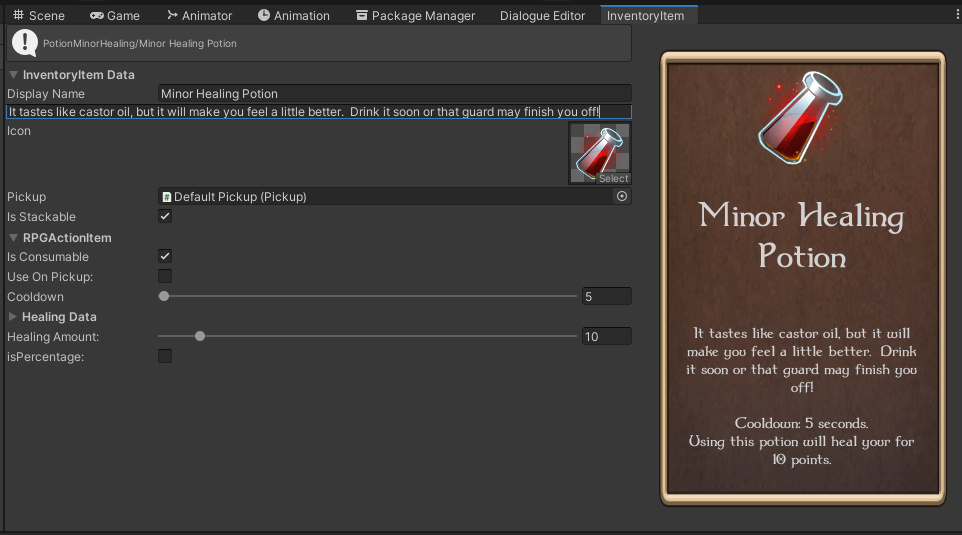
All of these with just one EditorWindow.
During this first post, I'll lay the groundwork to get things started, and we'll draw the basic inspector with the elements that all InventoryItems have in common. Many of these early steps will look familiar if you have completed the first few lessons of the Dialogues and Quests course where we set up the Editor Window.
Getting Started
Let's get started by creating a folder under Scripts/Inventories named Editor. In the Unity Assets structure, Editor is a magic word, much like Resources. Where any file in any folder named Resources is guaranteed to be included in your final build, any file in any folder named Editor is automatically striped from the project in a final build. This is important because Unity strips away everything derived from Editor when packaging the final build. By putting our EditorWindow in an Editor Folder, this prevents compiler errors.
Now create a new C# script and name it InventoryEditor. If you've been following the RPG courses, you should already be familiar with namespaces. Set the namespace to GameDevTV.Inventories.Editor. Change the class from deriving from MonoBehavior to EditorWindow and remove the Start() and Update() methods. We won't be needing those.
using System;
using UnityEditor;

namespace GameDevTV.Inventories.Editor
{
      public class InventoryItemEditor: EditorWindow
     {
     }
}
We'll need a MenuItem directive with a ShowEditorWindow method. The MenuItem directive adds an option to open the InventoryItem Editor window to Unity's menu.
        [MenuItem("Window/InventoryItem Editor")]
        public static void ShowEditorWindow()
        {
            GetWindow(typeof(InventoryItemEditor), false, "InventoryItem");
        }
We're also going to create a second method to call an Editor Window that takes a parameter of InventoryItem. This will be used by the OnOpenAsset to make sure that when we double click an item when the window is not open, that the item we double clicked on will be open in the window when it's opened. This method will not get the [MenuItem] tag, because a MenuItem cannot take any parameters.
        public static void ShowEditorWindow(InventoryItem candidate) {
            InventoryItemEditor window = GetWindow(typeof(InventoryItemEditor), false, "InventoryItem") as InventoryItemEditor;
            if (candidate)
            {
                window.OnSelectionChange();
            }
        }
We'll need a callback to hook into the OnOpenAsset system that Unity uses to select the correct editor when a file is double clicked.
        [OnOpenAsset(1)]
        public static bool OnOpenAsset(int instanceID, int line)
        {
            InventoryItem candidate = EditorUtility.InstanceIDToObject(instanceID) as InventoryItem;
            if (candidate != null)
            {
            	ShowEditorWindow(candidate);
                return true;
            }
            return false;
        }
We need to implement the build in callback OnSelectionChanged(). This is what the system broadcasts whenever a file is selected in the assets.
        void OnSelectionChange()
        {
            var candidate = EditorUtility.InstanceIDToObject(Selection.activeInstanceID) as InventoryItem;
            if (candidate == null) return;
            selected = candidate;
            Repaint();
        }
Note that we don't need to use the OnEnable and OnDisable to hook into the selection.selectionChanged as shown in the course. We can simply implement OnSelectionChange(). Like Awake() and Start() in MonoBehavior, it is called automatically if it exists in an open Editor Window.
Next, we need to implement the method responsible for drawing the EditorWindow, OnGUI(). This method is called whenever it needs to be to redraw the EditorWindow.
        void OnGUI()
        {
            if (!selected)
            {
                EditorGUILayout.HelpBox("No Dialogue Selected", MessageType.Error);
                return;
            }
            EditorGUILayout.HelpBox($"{selected.name}/{selected.GetDisplayName()}", MessageType.Info);
        }
The script above first checks to see if there is an inventory item selected. If there isn't, we'll leave a handy help box to inform the user to make a selection and then abort the method. After this check, it's safe to assume that our selection is valid and that we can draw the items we want to draw.
Setting Up InventoryItem.cs
The next step is to prepare InventoryItem to allow our editor to change the values. In the course project, InventoryItem.cs can be found at Assets/Asset Packs/GameDev.tv Assets/Scripts/Inventories/InventoryItem.cs
What we need are custom setters for our fields. As the fields in InventoryItem.cs are private, we can't simply change them directly from the editor window. Since we also want our editor to use the Undo system, it's important to use setters even if the fields are public.
The Undo system is Editor code. As I pointed out above, Editor code can't be in the final build. We can deal with this by simply surrounding code containing Undo with the #if UNITY_EDITOR/#endif processor directives. This will instruct Unity to discard the code when building our project for distribution, but allows us to use the code within the Unity Editor environment. Make sure that the rest of the code that we add to InventoryItem.cs is between these two processor directives.
Here is a basic setter for the first field in InventoryItem, ItemID
        public void SetItemID(string newItemID)
        {
            if (itemID == newItemID) return;
            Undo.RecordObject(this, "Change ItemID");
            itemID = newItemID;
            EditorUtility.SetDirty(this);
        }
The first line is to check to make sure that the item has actually changed. If the string hasn't changed, there's no point in setting an Undo point or setting the object's field as dirty.
The next line instructs the Undo system that the item will be changing. This will allow us to undo any changes by selecting Edit/Undo in the Unity Main menu or by pressing Control-Z
After the actual change is made, we instruct the EditorUtility that the object is "Dirty" and needs to be saved and reserialized.
This process will be repeated for every setter we use throughout the InventoryItem editor project. To reduce a small bit of boilerplate typing, I made a couple of helper functions for the Undo and SetDirty methods.
public void SetUndo(string message)
{
	Undo.RecordObject(this, message);
}

public void Dirty()
{
	EditorUtility.SetDirty(this);
}
This lets us make a small change to our Setters:
public void SetItemID(string newItemID)
{
	if(itemID==newItemID) return;
    SetUndo("Change ItemID");
    itemID=newItemID;
    Dirty();
}
Now we need setters for the remaining fields in the InventoryItem class
        public void SetDisplayName(string newDisplayName)
        {
            if (newDisplayName == displayName) return;
            SetUndo("Change Display Name");
            displayName = newDisplayName;
            Dirty();
        }

        public void SetDescription(string newDescription)
        {
            if (newDescription == description) return;
            SetUndo("Change Description");
            description = newDescription;
            Dirty();
        }

        public void SetIcon(Sprite newIcon)
        {
            if (icon == newIcon) return;
            SetUndo("Change Icon");
            icon = newIcon;
            Dirty();
        }

        public void SetPickup(Pickup newPickup)
        {
            if (pickup == newPickup) return;
            SetUndo("Change Pickup");
            pickup = newPickup;
            Dirty();
        }

        public void SetItemID(string newItemID)
        {
            if (itemID == newItemID) return;
            SetUndo("Change ItemID");
            itemID = newItemID;
            Dirty();
        }

        public void SetStackable(bool newStackable)
        {
            if (stackable == newStackable) return;
            SetUndo(stackable?"Set Not Stackable": "Set Stackable");
            stackable = newStackable;
            Dirty();
        }
Drawing the basic data
Now that the setters are in place, we can start drawing the actual fields. Like the Dialogue editor in the Dialogues and Quests course, we're going to be taking advantage of EditorGUILayout to automatically layout our fields for us. No complicated math to figure out where each field needs to be.
        void OnGUI()
        {
            if (!selected)
            {
                EditorGUILayout.HelpBox("No InventoryItem Selected", MessageType.Error);
                return;
            }
            EditorGUILayout.HelpBox($"{selected.name}/{selected.GetDisplayName()}", MessageType.Info);
            selected.SetItemID(EditorGUILayout.TextField("ItemID (clear to reset", selected.GetItemID()));
            selected.SetDisplayName(EditorGUILayout.TextField("Display name", selected.GetDisplayName()));
            selected.SetDescription(EditorGUILayout.TextField("Description", selected.GetDescription()));
            selected.SetIcon((Sprite)EditorGUILayout.ObjectField("Icon", selected.GetIcon(), typeof(Sprite), false));
            selected.SetPickup((Pickup)EditorGUILayout.ObjectField("Pickup", selected.GetPickup(), typeof(Pickup), false));
            selected.SetStackable(EditorGUILayout.Toggle("Stackable", selected.IsStackable()));
        }
Each field has it's own corresponding layout tool. We're using TextField for strings, Toggle for bools, and ObjectField for the Icon and pickup.
That last one looks a bit scary, but let's put it into practice for a sprite:
selected.SetIcon((Sprite)EditorGUILayout.ObjectField("Icon", selected.GetIcon(), typeof(Sprite), false));SetIcon is our setter in InventoryItem.cs. EditorGUILayout.ObjectField says we're selecting an object. "Icon" is the label for the field. selected.GetIcon() is the value that will be in the inspector before we change it. typeof(Sprite) tells the editor what type of object we're trying to select. False, the final field indicates if we should allow objects in the scene to be selected. Finally (even though it's before EditorGUILayout) we're casting the result from an object to a Sprite with the (Sprite) cast.
One more tiny bit of business to attend to, Inventory.cs does not have a method to retrieve the Pickup, meaning that in the above code selected.Pickup() does not exist. That's easy enough to fix in InventoryItem by adding a simple getter
public Pickup GetPickup()
{
	return pickup;
}
Now we can view our (not terribly impressive yet) custom inspector
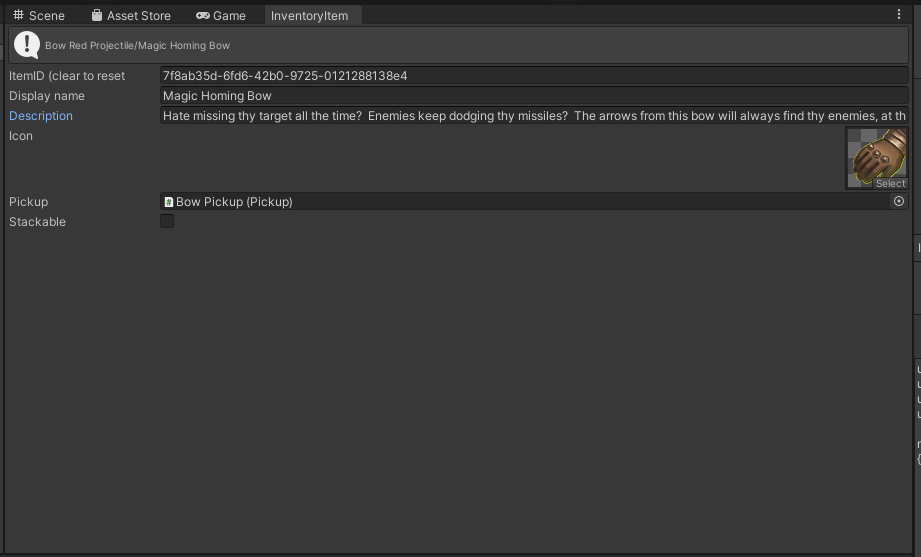
You'll note that we're still a long ways away from our completed inspector I showed you at the top of the post. We still need to implement the child members. The trouble is, we don't know what the child members are, or even what sort of child the InventoryItem is. As far as the EditorWindow is concerned, all it can see is the elements that are within an InventoryItem even though in the window above, we're editing a WeaponConfig.
We could test the item against each type/child of InventoryItem using casting and draw the custom inspector for that type. This solution, however, seems inelegant, and requires you to edit InventoryItemEditor with each new type you create. That doesn't seem like a big deal until you start creating lots of ActionItems. Each ActionItem will have a new class for each type of action (healing spells, fireballs, etcetera).
We'll set up the solution for this in the next post.
I've forked the RPG code from the course repo to show the changes made in this post.